Scheduling
Event types
Event types are the meeting formats prospects choose from when booking — define duration, location, and optional payment up front.
Personal vs. org event types
There are two kinds of event types in Cartoply:
- Personal event types — appear on your individual booking page (
cartoply.com/[username]). Managed from My Event Types in your personal workspace sidebar. These do not use territory routing and do not sync to Jobber — the Jobber integration is per-organization, so only org event type bookings create Jobber records. - Org event types — appear on your org's booking page and support territory-based routing. Managed from Event Types in the org workspace sidebar. Only bookings on org event types sync to Jobber.
If you manage a field sales team, create your meeting types at the org level. Personal event types are best for individual outreach or one-off meetings.
Creating a personal event type
- Go to My Event Types in your personal workspace sidebar.
- Click New event type. A prompt will remind you that org event types should be created in the org workspace — click Continue to proceed with a personal type.
- Fill in the name, slug, duration, and optional description.
- Set the location option — None, I'll provide, Google Meet, or Teams.
- Click Save.
On the free plan you can have one personal event type. Extra ones can't be created, and if you already have several, only the oldest active one is served on your public page — the rest show a Locked badge in the dashboard until you subscribe. Pricing and guest-supplied addresses are org-only features; see below.
Creating an org event type
- Open your org dashboard and click Event Types.
- Click New event type.
- Configure the same fields as a personal event type, plus the org-only ones: price, guest-supplied address and territory matching, booking mode, eligible groups, and member access.
- Click Save. The event type is now available on your org's booking page.
Booking mode
Org event types choose how a rep gets picked:
- Direct — the guest sees the eligible reps and chooses one.
- Round robin — Cartoply assigns a rep. Among those actually free at the chosen time, it picks the one assigned least recently, so work spreads evenly across the team.
Booking mode is unavailable when Slot display is set to Instant — instant booking always assigns the rep itself.
You can also narrow who's eligible with Eligible groups (see groups) or by excluding individual members under Member access.
Event type fields
- Name — what prospects see when choosing a meeting type (e.g., "30-Minute Discovery Call").
- Slug — the URL-friendly identifier. Auto-generated from the name but editable. Must be unique per user or org.
- Duration — length of the meeting in minutes. One-click presets cover 15, 30, 45, 60, 90, and 120 minutes; the More… dropdown goes up to a full day for site visits and multi-hour jobs.
- Description — optional text shown to prospects on the booking page to explain what the meeting is for.
Location options
Each event type has a location setting:
- None — no location is attached (virtual meetings, phone calls, or TBD).
- I'll provide — you enter a fixed location (Zoom link, a meeting room, or a physical address) that all bookings for this event type will use. The link or address has to already exist; Cartoply just repeats it.
- Google Meet (personal event types only) — Cartoply creates a new Meet link for every booking. Nothing to paste in.
- Teams (personal event types only) — the same, on Microsoft Teams. Requires a work or school Microsoft account.
- Guest provides (org event types only) — the prospect enters their address during booking, chosen from autocomplete suggestions. Use this for in-person field visits where you go to them. This is also the only setting that can turn on Match reps by territory.
Automatic video links
Google Meet and Teams generate a fresh meeting link per booking rather than reusing one address. The link is created on your own calendar at the moment the booking is confirmed, and it reaches the guest in their confirmation email and on the confirmation screen. It also appears in your new-booking notification and your 24-hour reminder.
Each option needs the matching calendar connected under Connections, because that's where the meeting is created. Until then the option is greyed out in the editor. Teams has one extra requirement: Microsoft only allows Teams meetings to be created on a work or school account, so a personal outlook.com or hotmail account can sync your calendar but can't generate Teams links.
These are personal event types only — the reverse of pricing and guest-supplied addresses, which are org-only. An org booking routes to whichever rep wins assignment, and their calendar connection is a separate thing from yours, so org event types keep the fixed-location settings.
If you disconnect the calendar an event type depends on, Cartoply switches that event type back to None rather than leaving your booking page advertising a call it can no longer create. The same happens if you reconnect Outlook with a personal Microsoft account. Rescheduling keeps the same link — the meeting is moved, not recreated — while cancelling deletes the meeting along with the calendar event.
Slot display: calendar or instant booking
The Slot display setting controls how open times are presented on the booking page. Availability rules and scheduling limits are identical either way, but on org event types it also changes who picks the rep.
- Calendar (default) — guests pick a date on a month calendar, then choose from that day's times. Best when guests have a specific day in mind.
- Instant booking — skips the calendar and shows a single, day-grouped list of the next available times, so a guest can grab the soonest slot in a couple of clicks. Best for "get me the earliest appointment" flows where speed matters more than picking an exact day.
For team (org) event types, instant booking merges the next-available times across every eligible rep into one anonymized list — the guest just picks a time and Cartoply auto-assigns whichever rep is actually free at that instant, rotating fairly so bookings spread evenly across the team. On territory-routed event types the guest enters their address first, then sees the merged next-available times for reps who cover their area.
Because instant booking assigns the rep itself, it overrides Booking mode — guests can't choose their rep on an instant event type, even one set to Direct.
Set this in the event type editor under Slot display. Not sure which converts better? Test it with an A/B experiment (org event types).
Pricing
You can charge a fee on org event types (personal event types are always free — pricing lives where your team's booking flow does). Leave the price blank for free meetings. To enable paid event types:
- Make sure this organization has an active paid subscription with a payment on its latest invoice, or an admin-granted free access plan. Trials alone do not qualify.
- Connect a payment provider under Integrations in the org workspace (Stripe or PayPal). Stripe uses this organization's selected account; PayPal uses the event creator's credentials.
- On the org event type form, enter a price and select the currency.
- The guest's card is authorized before the slot is secured, then charged once it is. If someone else takes the slot first, the authorization is released and they're never charged.
Paid event types can't use manual approval — see Pre-qualification.
Charging upfront is a proven way to reduce no-shows for field visits — see our blog for more on this.
Refunds. If you cancel a paid booking, the guest is automatically refunded in full. If the guest cancels, the booking is flagged Refund due on your Bookings page and you decide — click Refund to return the payment, or Deny and give a reason, which is stored on the booking and emailed to the guest (useful when your cancellation policy keeps a late-cancel fee). A denied refund can still be issued later. You can also refund any paid booking manually at any time, including completed visits and no-shows. See Refunds for details.
Scheduling limits
Every event type has a Scheduling limits section that controls when guests can book:
- Buffer before / after — required gap (in minutes) around each appointment. Use this for drive time between jobs or prep time between calls. Slots that would violate a buffer against an existing booking are hidden automatically. Gaps are protected in both directions — an existing booking's buffers hold even against event types with smaller (or no) buffers, and when two bookings each require a gap, the larger one applies.
- Minimum notice — how far in advance a guest must book (e.g., 4 hours). Prevents same-minute bookings you can't actually staff.
- Max bookings per day — caps how many confirmed bookings the attending person can take per day. Once the cap is reached, that day shows no slots. Leave blank for unlimited.
- Booking window — how many days into the future guests can book (default 60). Dates beyond the window are disabled on the calendar.
- Cancellation cutoff — how close to the appointment guests can still self-cancel or reschedule from their confirmation email (default 24 hours).
Limits are enforced both when slots are displayed and again at booking time, so a guest who leaves the page open can't book a slot that's no longer allowed.
Booking questions
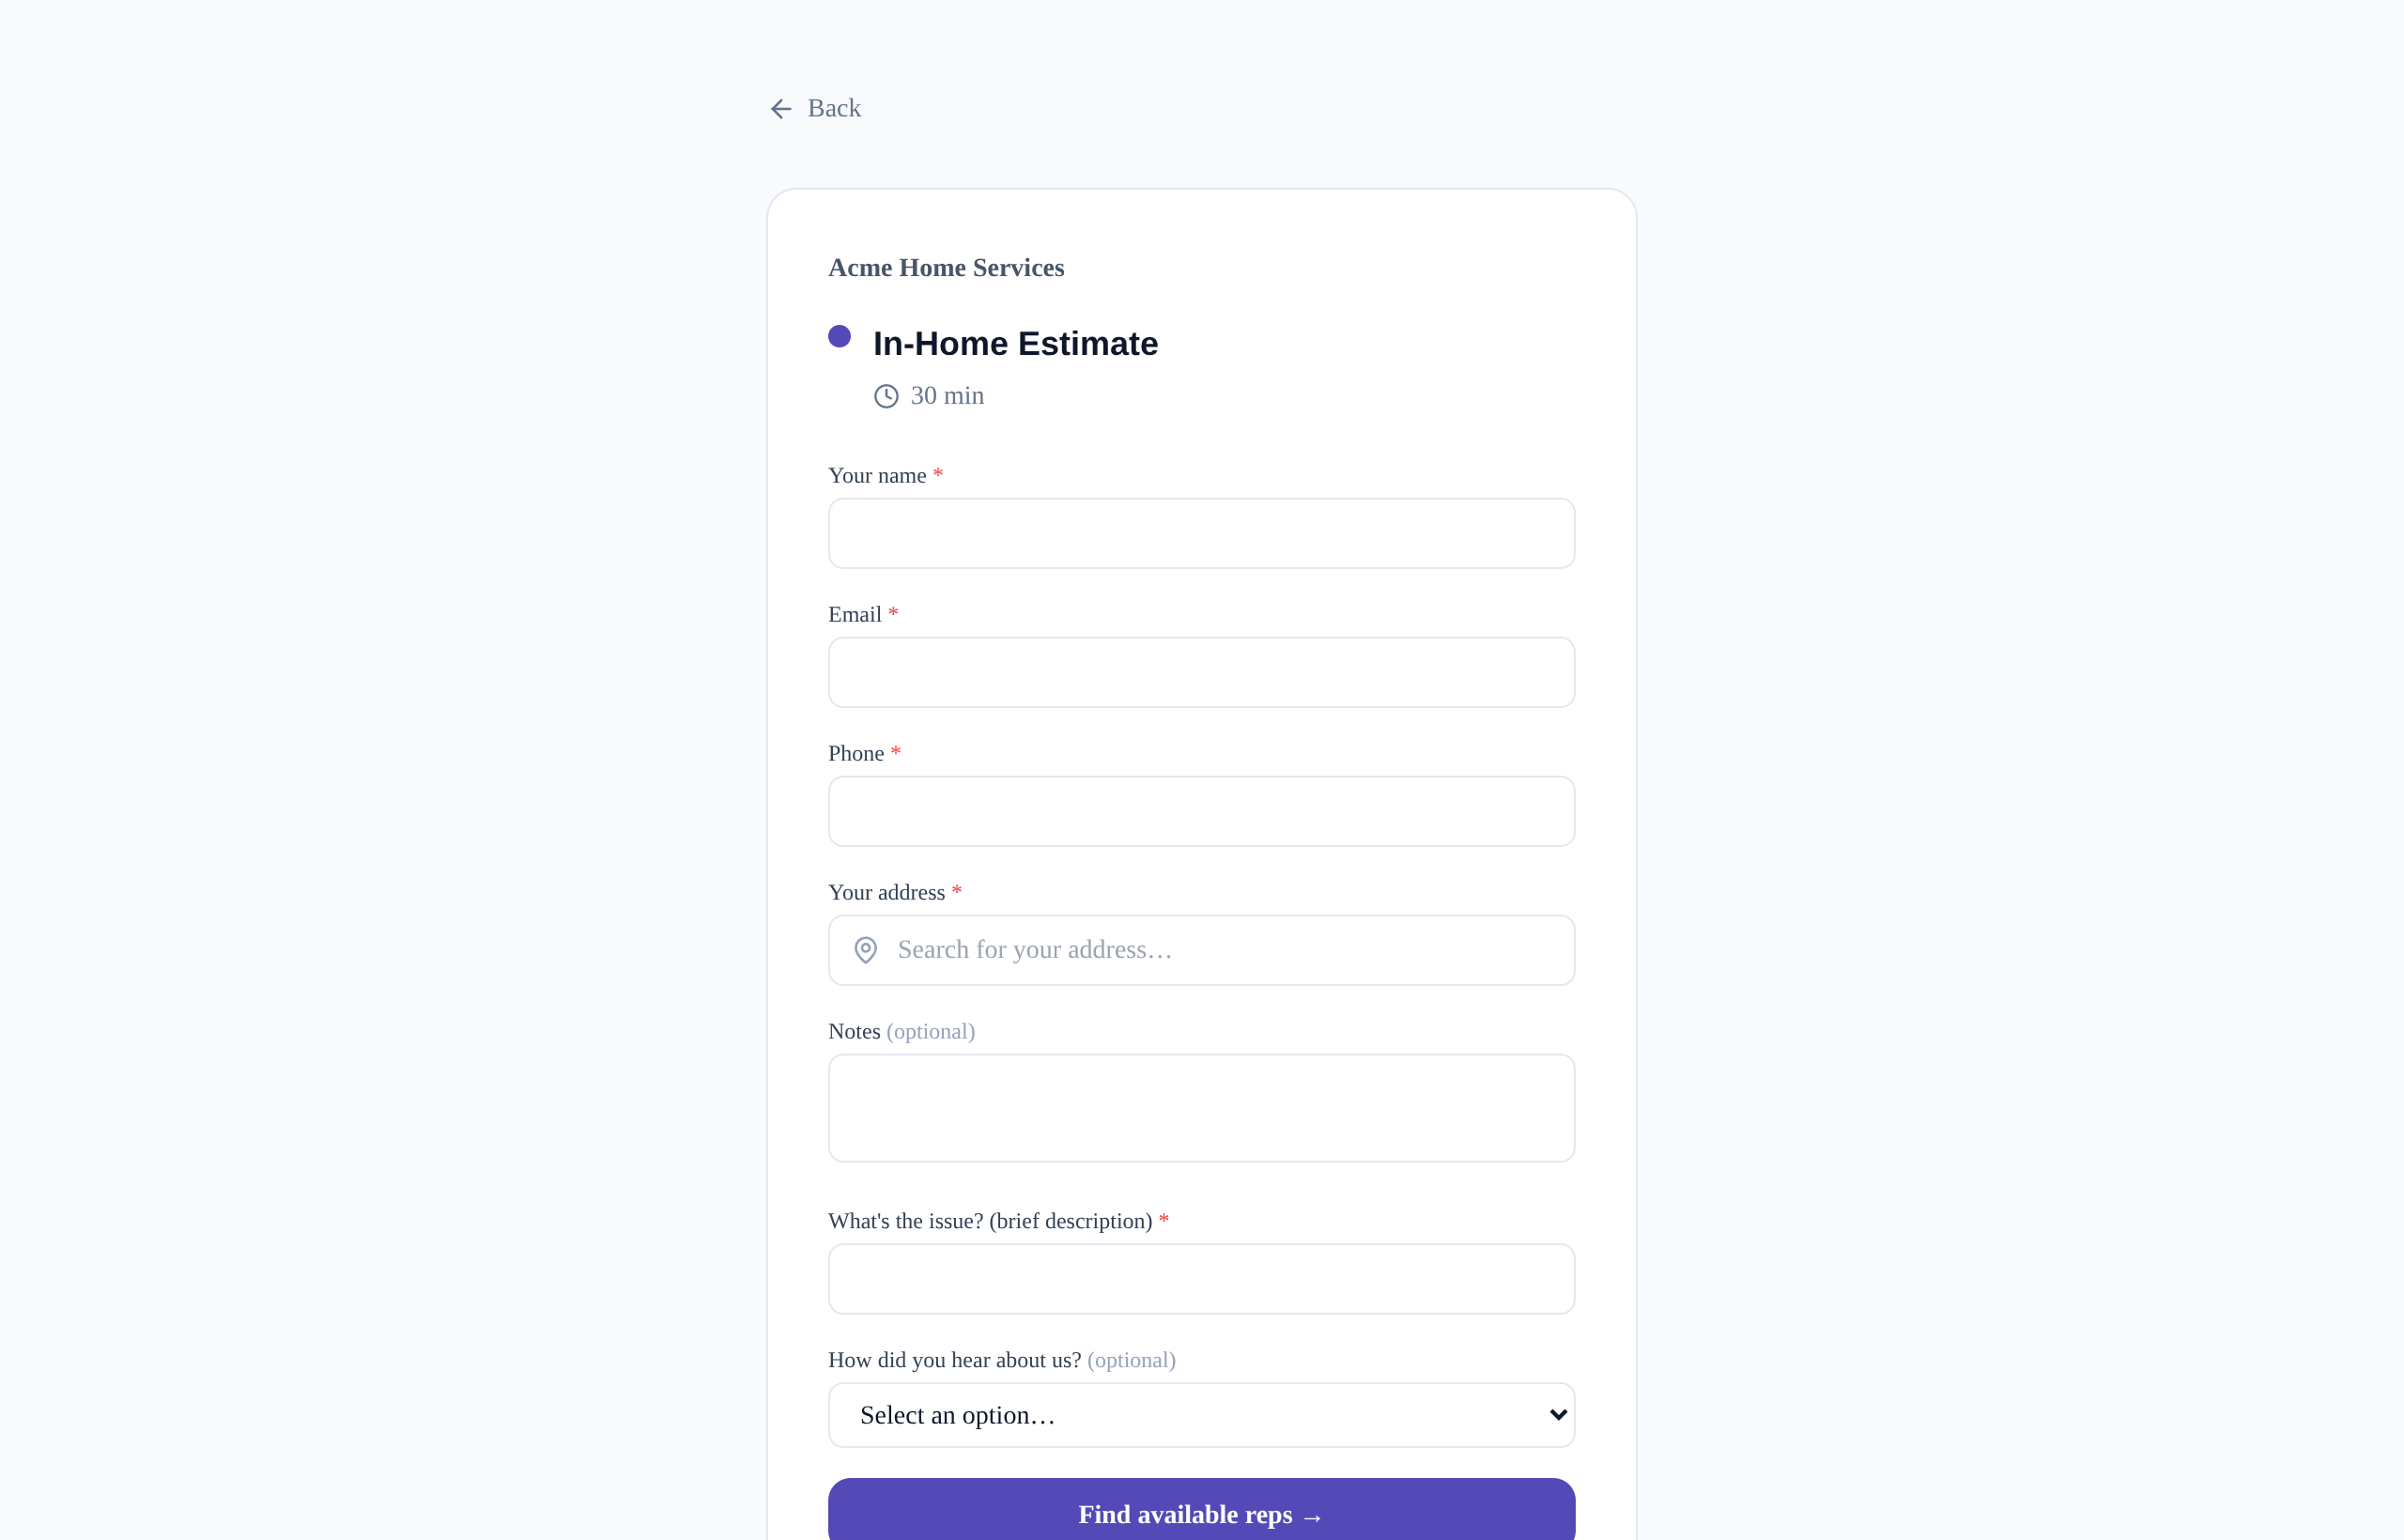
Add up to 10 custom intake questions per event type — for example "What's the issue?", "Gate code", or "How did you hear about us?". Question types: short text, long text, dropdown, and checkbox; each can be marked required.
Guests answer during booking (every guest also provides name, email, and phone as standard fields). Answers appear in the confirmation and notification emails, on the booking record, and — for org bookings with Jobber connected — in the Jobber Assessment's instructions.
Booking approval (pre-qualification)
By default, bookings are confirmed instantly. Switch the Booking approval setting to Review requests to vet bookings before they're confirmed — useful for filtering out low-intent enquiries ("tire-kickers") before they take a slot on your calendar.
How it works:
- A booking that needs review is held as a request rather than a confirmed booking. It is not placed on your calendar and does not reserve the time slot — the slot stays open for other guests until you approve.
- The guest sees a "Request received" screen and gets an email saying their time isn't reserved until it's confirmed. You get a "new booking request" email with their answers.
- You approve or decline from the Requests tab on your Bookings page. Approving secures the slot for real (if someone else booked it in the meantime, you'll be told to ask the guest for another time). Declining cancels the request and optionally emails the guest a reason.
Screening rules. With no rules, every booking becomes a request to review. Add rules to only review some bookings — a booking is held for review whenever any rule matches the guest's answer, and everything else books instantly. Each rule reads one of your booking questions, for example "Service is any of Drywall repair, Other" or "Budget is less than500". Operators include is, is not, is any of, contains, is blank, is less than, and is greater than.
Note: manual approval applies to free event types only. If an event charges up front, either clear its price or switch Booking approval back to Book instantly. (Since only org event types can carry a price, this constraint never affects personal ones.) Changing slot display to Instant does not lift it.
Specializations (answer-based routing)
On org event types, specializations route a booking to specific team members based on a guest's answer. For example, if a guest selects "Tankless water heater" for the service question, send that booking only to the reps who handle tankless work.
- Each specialization is a rule (same questions and operators as screening) plus the team member(s) or group(s) to route to. A group expands to its members.
- The first matching rule wins. One target means the booking is assigned to them; with several, Cartoply picks from that set the specialist who was assigned least recently.
- Routing still respects territory and availability — a specialist who isn't available for the chosen time won't be assigned.
- If a matching rule names no eligible member (for example they were removed from the event type), Cartoply falls back to normal routing so a real customer is never turned away.
- Specializations compose with approval: a held request is pre-routed to the right specialist, so approving it confirms with that person.
Eligible groups (org event types)
Use Eligible groups to restrict an org event type to one or more groups. Only members of the selected groups can be booked, and round-robin rotates within that set. Leave it empty and every member is eligible (the default). This is a cleaner alternative to the Member access panel, which excludes people one at a time.
A/B experiments (org event types)
On org event types, run an A/B experiment to test which booking-page presentation converts better — for example calendar vs. instant booking — using your real traffic instead of a guess. Experiments are managed from the A/B test this booking page panel in the org event type editor (admins only). The panel appears when you edit an existing event type, not while creating one.
How it works:
- Each visitor is bucketed into variant A or B deterministically, so the same person always sees the same version and your split stays even. You choose the split (default 50/50). A visitor whose browser blocks local storage is served variant A and left out of the counts entirely.
- Experiments only vary presentation (today: the slot display). They neverchange price or payment, so no guest is ever charged differently by a test.
- Cartoply counts a view each time the booking page loads under a variant and a booking when that visit results in one. Held approval requests count, and so do bookings that are later cancelled — the test measures whether the page persuades people to book, not what happens afterwards.
- The panel shows each variant's views, bookings, and conversion rate, plus a significance readout. It stays on "Not enough data yet" until both variants have at least 30 views, then reports whether the difference clears 95% confidence.
- When you're done, stop the experiment. Choosing promote applies the winning variant's settings to the event type for everyone. Only one experiment runs per event type at a time.
A/B experiments are an organization feature — personal event types don't include them.
After booking: custom redirect
By default, guests see Cartoply's confirmation screen after booking. You can instead send them to your own page — a thank-you page, an upsell offer, or a "what happens next" explainer:
- Org-wide — an org admin sets the URL in Org dashboard → Settings → After booking. It applies to every org event type. Leave it blank to disable.
- Per event type — in the event type editor, enable Redirect guests to a custom page after booking and enter a URL. This overrides the org-wide setting for that event type (personal event types have the same option; it's simply the only redirect since there's no org default). It's off by default.
Cartoply appends the booking details to your URL as query parameters — invitee_name, invitee_email, event, and start (ISO timestamp) — so your page can greet the guest by name or fire conversion analytics. The URL must be a full http:// or https:// address.
Bookings held for review (see Booking approval above) never redirect — those guests always see the "Request received" screen so they know their time isn't confirmed yet. For how redirects behave inside website embeds, see Sharing booking links.
Toggling event types on and off
Use the toggle switch on each event type card to activate or deactivate it. Inactive event types are hidden from your booking page without being deleted — useful for seasonal or temporary meeting types.
Deactivating is also the way to retire an event type that's still in use: deleting one is blocked while it has upcoming bookings, so those guests don't lose their appointment. Turn it off, let the existing bookings run out, then delete it.